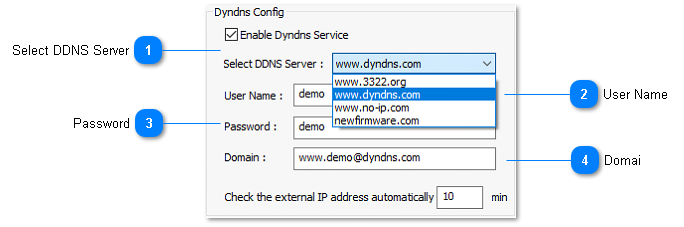
In order to connect to a T3 controller from a remote site you’ll need to follow a few steps. The T3 controllers have a dyndns updater feature so that you can use a dynamic IP address rather than paying for a permanent IP address. There are three free services and also a popular paid service at Dyndns. Access these by connecting to the T3 controller and then clicking on the advanced gear icon which brings up the dyanamic IP address settings. You’ll need to set up an account at one of the listed services and enter the user/password credentials here along with the domain name you chose when signing up for the account. The T3 controller will then connect to the domain service and update the IP address of the controller periodically. Since the IP doesn’t change often a setting of ten minutes will be fine.
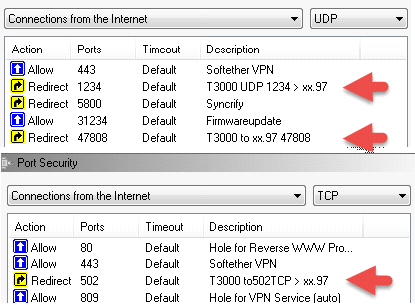
In your router you’ll need to set port forwarding to the IP address of the controller for the following ports:
UDP port 1234, for the scan command.
UDP port 47808 , for bacnet comms.
TCP 502 , for Modbus.
You can use the tools at portforward.com to check that port forwarding is working correctly.
[TBD]: Get rid of the can on port 1234, scan on port 47808 instead.
Here are the settings for a typical setup showing the various port forwards for a wingate router in this example. Your router will have a different appearance but similar general settings to configure.
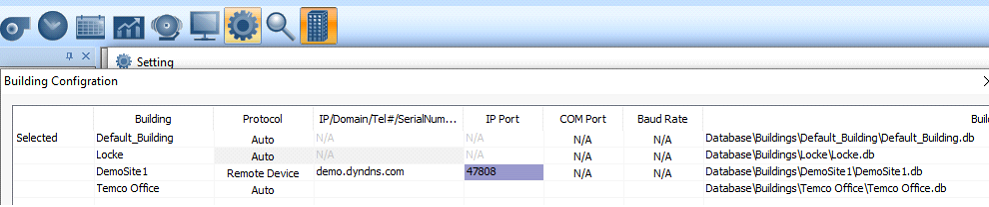
Then set up the remote connection for the particular building. Select the building icon which pops up the database of all buildings you will connect to. Add an entry and set the Protocol field to remote device, then enter the domain name you configured before, demo.dyndns.com in this example. The IP Port is set to 47808, this entry will eventually let you configure which port to connect to the building, for now it is ignored.